For decades the pipe sat in the toolbox as a relief option. When the pass was good and the setter wanted to surprise the block, a high ball would float to the middle of the back court and the position six hitter would attack from behind the three-metre line. It scored points, but the tempo was slow enough that a well-organised opposing block could close the gap in time. That is no longer the picture at the top of the international game.
Through the 2025 international season and into the 2026 Volleyball Nations League, coaches have flattened the pipe trajectory dramatically. The set now arrives at a tempo close to a middle quick, forcing the opposing middle blocker to commit before they can read the play. The result is a four-hitter offence that pulls the block apart and creates clean swings for both pins. If you are still coaching the pipe as a slow safety net, your team is playing a slower game than the modern attack demands.
What Has Changed in the Modern Pipe
The traditional pipe peaked roughly two metres above the net, giving the hitter time to read the block and pick a line. The modern pipe peaks barely a metre above the antenna and travels in a flat arc that mirrors the rhythm of a one-set to the middle. The hitter is already in the air before the ball reaches its high point, contacting the ball with the trajectory still rising.
Tempo: The hitter launches as the setter contacts the ball, not after. The approach must be triggered by the second contact, not the set itself.
Set shape: A flat, fast ball that crosses the net at roughly the same height as a back-row quick. Setters need confident hands and a willingness to push tempo even when the pass is not perfect.
Visual disguise: Because the pipe now matches the tempo of a middle attack, the opposing block can no longer use set height to decide where to commit. The middle blocker who steps to cover the quick exposes the pipe, and the middle blocker who hesitates exposes the quick.
How to Coach It
Building a quick pipe is a progression. Trying to introduce it from a cold start will produce mistimed swings, frustrated hitters and setters who lose confidence in the play. Work through the stages over a block of sessions rather than a single training.
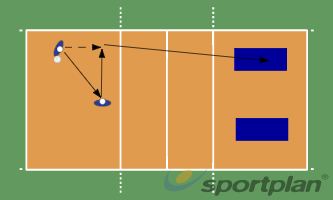
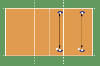
Step One - Tempo Calibration: Place the hitter behind the three-metre line and have the setter deliver flat sets from a stationary position near the net. Start at a comfortable medium tempo and gradually compress the time. The hitter should be in the air on the way up to a clean swing, not waiting at the apex.
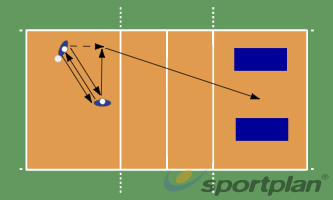
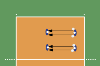
Step Two - Approach Trigger: Add a passer feeding the setter. The hitter must now read the pass and trigger their approach as the setter releases, not when the set is in the air. Coaches should watch the hitter's first step - it must come on the second contact, not after.
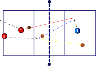
Step Three - Live Block Pressure: Put a two-person block in front of the setter so the hitter learns to swing past a real defensive picture. The hitter does not get to wait and pick a hole - they must trust the tempo and commit to a line before the block fully forms.
Step Four - In-System Integration: Run the pipe inside structured offensive patterns. Use a call system so the setter can choose pipe, quick, or pin attack from the same pass. Track first-ball side-out percentage with and without the pipe in the system - the lift in attacking efficiency is usually obvious.
When the Pipe Becomes Most Effective
The pipe is at its most dangerous when the opposition has scouted your pin hitters and is loading the block to outside. A quick pipe forces the middle blocker to honour the centre of the court, which thins the block on the pins by one body. Suddenly the outside hitter is facing a single block, and your team is winning rallies that were stalemates a season earlier.
It is also a transition weapon. When the rally extends and the opposition is forced into a defensive scramble, the back-row hitter is often the player with the best balance and visual contact with the setter. Setters who trust the pipe in transition score points that other teams give away with a high outside ball straight into a set block.
Key Coaching Points
- Trigger the approach on the second contact, not the third
- Keep the set flat and on a consistent line - if the setter is inconsistent, slow the tempo before pushing it
- Train the libero or back-row passer to step out of the hitter's lane immediately after contact
- Use the pipe to pull the middle blocker off the pins, not just as a standalone scoring play
- Measure success by side-out percentage and block touches, not just kills