ALPHA

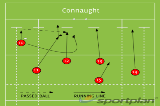
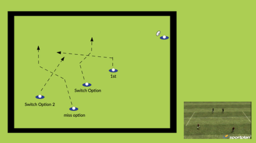
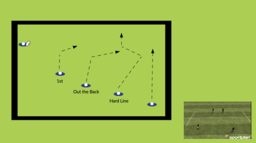
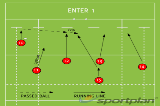
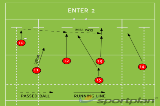
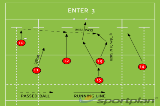
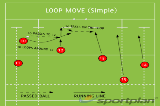
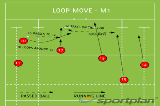
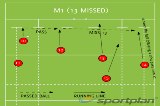
10 is the ball carrier, advancing forward, before cutting in as shown in the diagram. Both 12 and 13 advance, then change direction as shown in the diagram. 12 and 13 switch. 10 provides a pass to 13, who either hits the opposition defensive line at an angle before straightening up. Think about what will happen next. Could 10 follow the pass and take an off-load on an inside ball, if 13 gets past the gain line could 15 and 14 off wide support? Make this move your own!
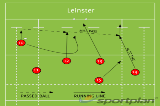
Backs Moves

Connaught

Carries the ball forward, inviting the defence to press up. 10 Passes to 12. 10 loops around 12 following their pass, 10 should aim to draw attention to their run, they are a decoy. 11 presses up, and and then at speed changes the angle of their run, hitting the inside shoulder of 12. This pass should be as close to the opposition defence as possible. 12 passes to 11, 11 take on an angle. Think about what will happen next. Could 12 cancel and offer an outside ball to 10, could 11 pass to 13 and then out via the rest of the back-line. It's vital that your team makes this move your own!

Backs Moves

D1 - Dummy Loop

Use the diagram in order to think about the starting position of your players, I suggest that they are not too deep for this one. 10 passes the ball to 12. 11 loops behind 12. 12 advances with the ball. 12 pass the ball to 11, this should be a close to the defensive line as possible. 13 runs a line, at speed, close the space between them and 11. 11 does their best to avoid contact, but if they do take contact, they should attempt to off-load to 13.

Backs Moves

4 vs 3 team shapes/backs moves attacking drill

Drill to practice team shapes or backs moves against a defence with less numbers than the attack. Set up a "ruck" with a scrum half/feeder, 3 defenders on the back foot of the "ruck" and 4 attackers opposite them. The attackers attack the defence, then turn round and attack back the way they have just come.  Progressions: Change the set up of the attack, for example a blindside winger or full back in behind Change the number of attack/defence Change the defensive system (e.g. hammer, blitz, ice, up and out, umbrella)

Backs Moves

Backs move - Rangi

Use the diagram to highlight suggested starting positions. 10 is the ball carrier, advancing forward, before cutting in as shown in the diagram. 12 advances, and cut in on the same line as 10. 13 advances and cuts across 12, taking a switch pass from 10. 15 and 14 press up.

Backs Moves

Backs move: DSM (Dummy Switch Miss)

- 1st reciver runs a dummy switch with the 12.  - 15 runs an under and out line of the back of the 13. - The 10 now has an option of hitting the 13 on a hard line.  - Or missing him and hitting the 15 on the outer line. 

Backs Moves

BacksMove - Slice

- Essentially 12+13 swap places. - This will make their opposite track them  - The 13 runs an out and in hardline. -The 12 runs an out the back option then strightens up.  - Read what option is best on, reading the defensive system.

Backs Moves

Blindside Wing

Moving the ball along the line this play sees 11 run up behind 10 to support the line and blind side the opposition. 10 plays a pop pass for 11 to run onto.

Backs Moves

Choose the hole

9 10 miss 12 straight to 13 with 15 running a support line. 15 needs to run into the hole wherever it is. Needs to 'check / scan'!

Backs Moves

Dummy Switch Behind (DSB)

10 advances with the ball, running slightly inwards. 10 changes the angle of their run, towards the first post. 12 runs across 10 on a dummy switch. 10 fakes a pass to 12, but keeps going. 13 runs parallel to 12. 11 runs across and behind 13. 10 passes to 11, the ball should be passed behind 13. Think about what will happen next, passing option, cancel options, and variations on this move. Your back-line should remain flexible at all time.

Backs Moves

ENTER 1

Use the diagram to help with players starter positions, but feel free to experiment. 10 carries the ball forward, inviting the opposition defence to press up. 12 runs forward, at pace. 11 runs between 10 and 12, providing a decoy. They could even overrun the ball, allowing 10 to pass behind 11. 10 passes to 12. 15 runs forward, then changes their angle of run to a fast run off the outside shoulder of 12. 12 passes to 15 as close to the defensive line as possible.

Backs Moves

ENTER 2

Use the diagram as suggested starting positions, but be flexible. 10 carries the ball forward, inviting the opposition defence to press-up. 12 advances. 10 passes to 12, 11 could provide decoy or a cancel option. 15 runs forward, then runs a line support 12, hitting tight on their outside shoulder. 12 miss-passes beyond 15 to 13. Think about the other players positions, cancel options and alternatives. Players need to be flexible in attack.

Backs Moves

ENTER 3

10 carried the ball forward, inviting the defence to press up. 11 runs a decoy line. 10 passes to 12. 15 runs a line between 12 and 13, see diagram. 12 miss-passes to 13, skipping 15. 13 runs an under before taking the ball. 14 runs a supporting line for the ball carrier.

Backs Moves

ENTER 4

10 carried the ball forward, inviting the defence to press up. 11 runs a decoy line. 10 passes to 12. 15 runs a line between 12 and 13, see diagram. 12 miss-passes to 13, skipping 15. 13 runs an over before taking the ball. 14 runs a supporting line for the ball carrier.

Backs Moves

Join the Line

9 10 12 miss 13 to 15 and 14

Backs Moves

Leinster

Use the diagram as a starting point for players. 10 advances carrying the ball, inviting the defence to press up on the attack. Optional, 11 could provide a decoy option. 10 passes to 12, who advances onto the ball. 10 loops around 12, decoy. 12 carries the ball forward. 13 runs a supporting line on 12, closing the space between the players. 12 miss-passes the ball behind 13 to 14. 14 advances with the ball, supported by 15.

Backs Moves

LOOP MOVE (SIMPLE)

See the diagram for suggested starting positions. 10 passes to 12. 10 loops around 12, 12 passes to 10, this pass should be as close to the opposition defensive line as possible. 10 should hit in tight off 12's shoulder. 13 should run a decoy line, allowing 10 some space to attack. Optional, 10 passes to 13, possibly in contact via an off-load. Think about how other players can support the ball carrier.

Backs Moves

LOOP MOVE - M1

See the diagram for suggested starting positions. 10 passes to 12. 12 moves forward. 10 loops around behind 12. 10 hits in on the outside shoulder of 12. 12 passes to 10. 13 attacks inwards at speed, calling the ball. 15, and 14, press up at speed. 10 makes a miss-pass to 15. Be cautious of an interception.

Backs Moves

M1 (13 MISSED)

See the diagram for suggested starting positions. 10 moves forward with the ball, drawing the defence to press. 10 passing to 12, 12 is moving forward. 13 presses up fast, overrunning the ball, but only just. 14 presses up, closing in, and cutting the space between them and 12. 12 throws a miss-pass to 14. Be careful of an interception. 15 supports 14, providing an inside option.

Backs Moves

M1 (13 MISSED, 14 OVER)

See the diagram for suggested starting positions. 10 moves forward with the ball, drawing the defence to press. 10 passing to 12, 12 is moving forward. 13 presses up fast, overrunning the ball, but only just. 14 presses up, closing in, and cutting the space between them and 12. 12 throws a miss-pass to 14. Be careful of an interception. 14 runs an over. 15 supports 14, providing an inside option.

Backs Moves